Sunday, May 31, 2015

Pre-drywall Inspection Report

The report from our inspector was sent to us and our PM via email this morning. It's an itemized list of all the issues that were found along with pictures to accompany just about each item. I'm going to list them all out so you can see what kind of things are picked up during this type of inspection so I apologize that this post is going to be huge.

Interior

1. Fire seal all areas where penetrations are present through the floors and ceilings.

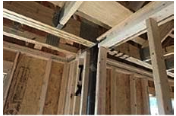
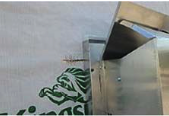
2. Install a proper size and fitted 2 x 4 blocking under the garage beam, right hand side.

3. Flush up the 2 x 6 stud left of the garage steps. Then secure all studs where they do not twist at the base plate.
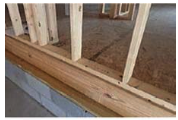
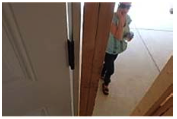
4. Add shims and blocks at the exterior door frames where larger gap is present and especially at the hinges.

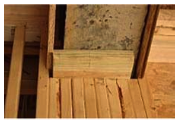
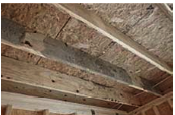
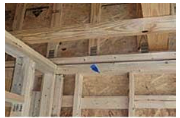
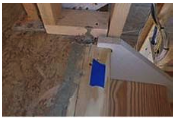
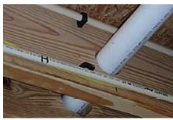
5. There are larger holes drilled into the floor joist than needed. Special braces are needed on several areas to give back the proper support.

6. The exterior wall studs at the kitchen hood vent area are bowed inward. Have replaced as needed to be flush.

7. The exterior stud on right side 1st floor is broken at the top plate from 10 nails popping it off. Brace as needed.

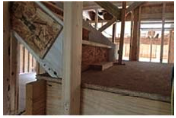
8. Clean the mud off the ceiling joist seen in the living room.

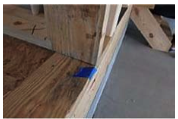
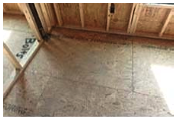
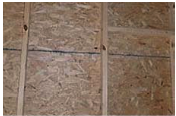
9. The subflooring is not secure properly in the front left bedroom seen beside the metal poll.

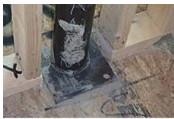
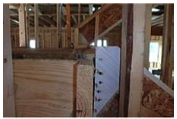
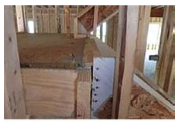
10. The metal poll upstairs is improperly installed at the floor and base plate. The fabricated and design if for a different layout. Have corrected.

11. The wall is separated at the top for the metal pole to pass and the wall needs better support to each half.

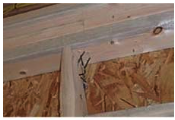
12. The drywall nailer plates seen above the upper wall plate is not secured flush. This will cause the drywall to not be level. Secure all plates to be solidly flush.

13. Remove the wood block from the wall of the master closet.

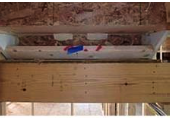
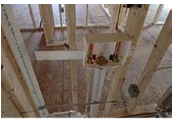
14. Secure the master bath shower plumbing pipes where seen coming through he wall.

15. The roof sheathing is missing many of the required sheathing clips between the roof trusses.

16. Sink many nails around the walls that are sticking out more than 1/8”

Stairs

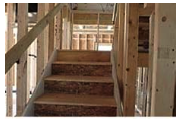
17. The middle landing is not level.

18. The middle level stair tread is damaged and dip in the middle.

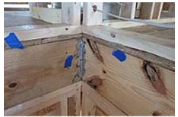
19. The gaps in‐between the stringers and landing platforms need to be filled and secured better.

20. The middle landing tread is not level with the landing itself.

21. This is the time to add liquid nails and bracing to the stair system to assure minimal movement and squeaks.

22. Remove the excess nails and liquid nail seen at the stair landings.

Plumbing

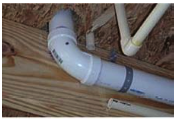
23. The water pipe was cut apart under the laundry room, for the drain pipe to pass by. It was never re‐worked and open pipes exist.

24. The plumbing pipes in the area has been taken loose from there clamps. Re‐work.

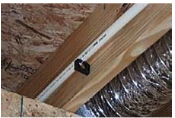
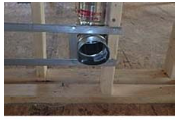
25. Re‐work the dryer vent pipe to be round instead of oval.

26. Secure the laundry box on the left side as it is on the right side.
Exterior

27. Sink many of the nails that are sticking out of the braces.

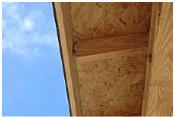
28. Add blocking behind the soffit rake boards where butt joints are present.

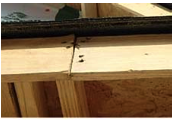
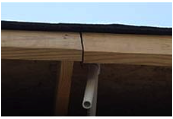
29. Add blocking behind the fascia boards where they do not meet the roof joist. Having gaps creates movement and not keep it from staying straight.

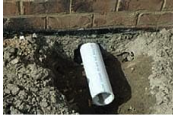
30. Seal around all pipe penetrations where coming though the foundation.

31. The vent pipe on the right side is not a solid pipe as standard. Have solid pipe penetrating the exterior wall.

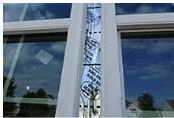
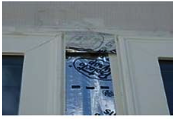
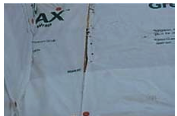
32. The window self‐flash edges are taped but the tap is not completely sealed properly. Seal tape down properly and add more between the windows that are close to one another.

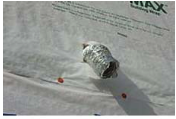
33. Seal the horizontal cuts in the wrapping seen at the fireplace cap.

34. Seal the cuts in the wrapping around the house to not have openings where water can penetrate.

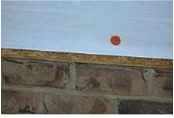
35. Install wrapping on all exposed wood sheathing around the bottom edges of the house where bare wood is seen.

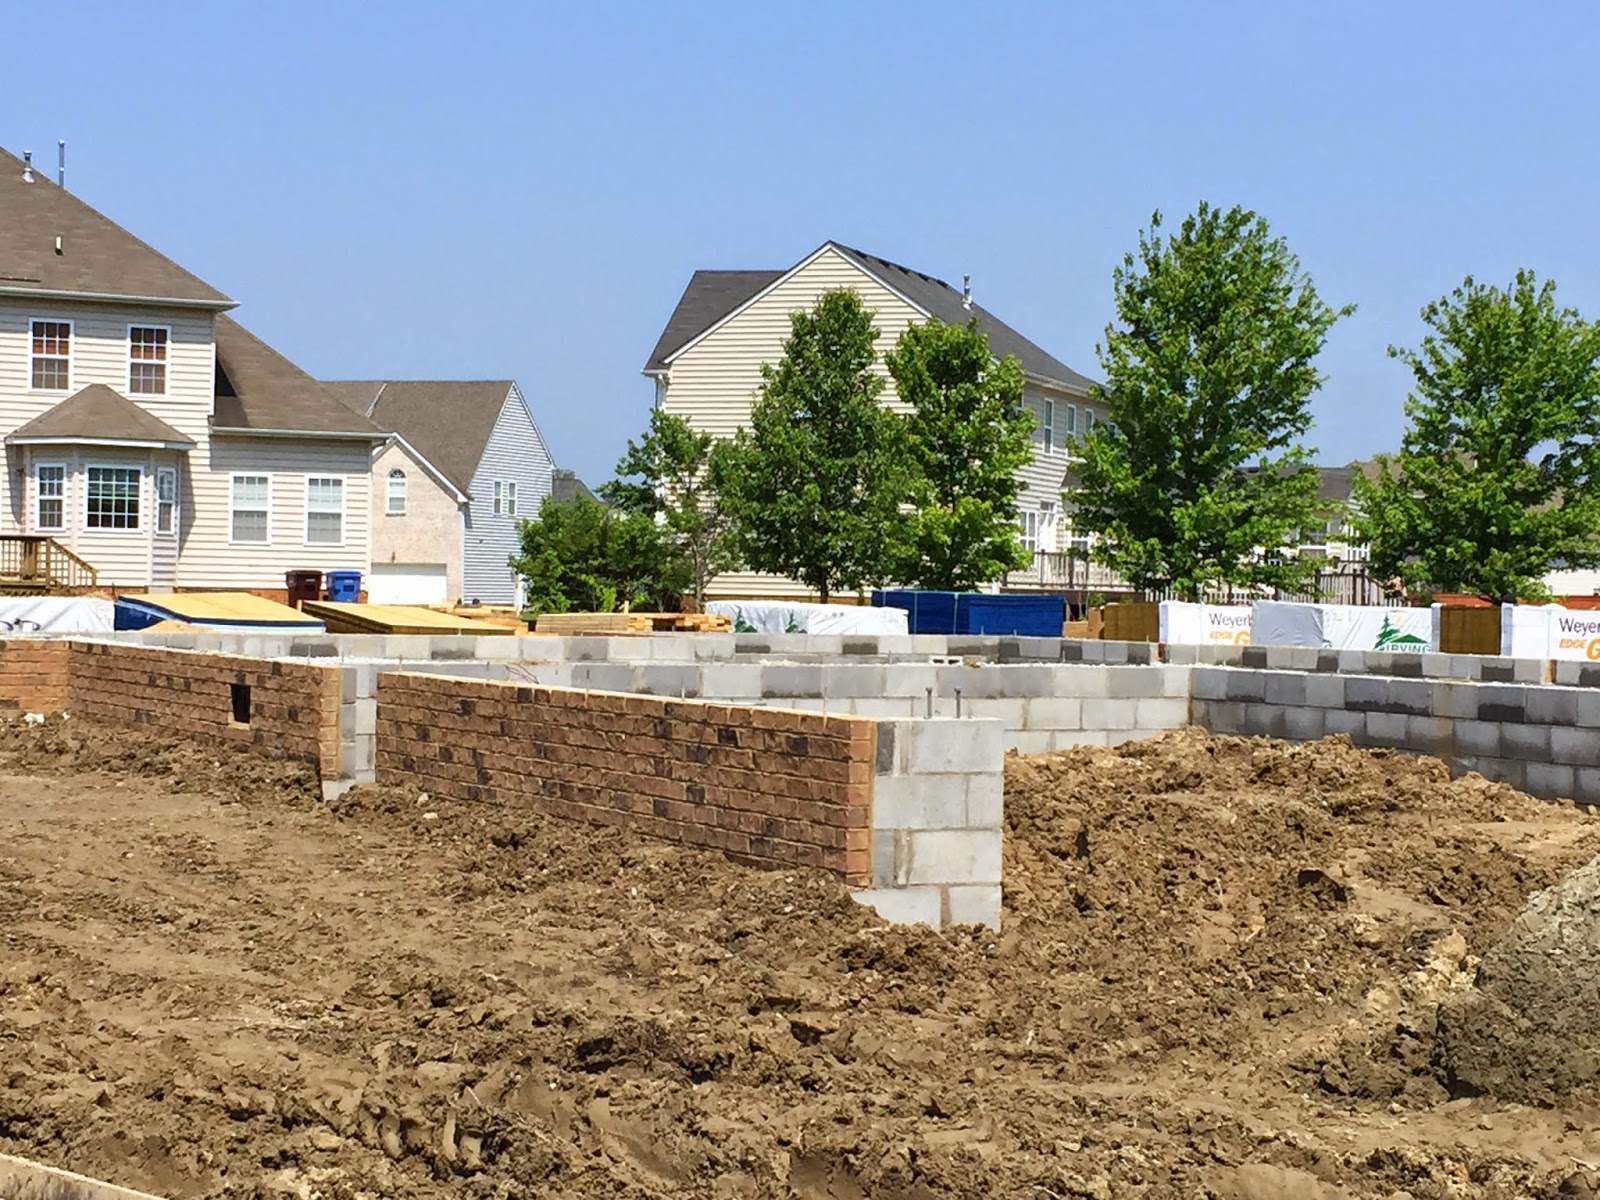
So as you can see, he found a good deal of items he recommends be corrected, some more serious than others. In the end I'm not sure if these would have been picked up on by our PM or his inspector, but the piece of mind is well worth the few hundred dollars we spent on the inspection. If any of these things can save us time, money or heartache down the road it's definitely worth it. Our PM has a copy of this and I'll keep you posted as to when the changes are made and the outcome.


Pre Drywall Meeting and Inspection

We had our pre-drywall meeting with our PM on Friday May 29th. We had also decided to bring in an outside inspector to perform a pre-drywall inspection. This was initially recommended by our realtor, and after doing some research and speaking with an inspector we felt it was a good idea. Basically he was looking for issues with the framing, plumbing, exterior, and wiring. Things that will all be covered up as soon as the drywall is in place and we'd never know if a problem was lurking behind the walls just waiting to give us a headache.

We were all supposed to meet at 8am, but our inspector was caught in tunnel traffic (if you know Hampton Roads at all you're familiar with the phenomenon), and he ended up being about 35 mins late. That being said, we went through the house with our PM first. My husband had to be back out in CA to checkout with his unit but was able to FaceTime for the meeting, so he was able to see most of what was happening and ask questions. Basically our PM took us around the outside of the house, showed us where drainage piping was, talked about the wrapping on the house, window sealings, fireplace venting, access to the crawl etc. Many of these things will be discussed further in the future when he explains how to maintain the home. We then went into the home and he reviewed electrical outlets, wiring placements, lighting, the plumbing, kitchen layout etc.

There was one thing which we were disappointed in. We chose to have the attic storage option and our PM has been telling us all along that he would floorboard as much of the attic as possible and we'd have tons of storage space. He continually alluded to the fact that the whole attic would be floor boarded. This being said we asked if we could move the attic access out of the hallway and either into the laundry room or possibly the guest room (since it won't be used daily). We both just feel that the attic access right in the hallway is a bit of an eyesore. Over and over we were told this should be no problem and they'd take care of it. Well last week when I was at the house meeting with the wiring co we noticed the attic access is in the hallway. When I called the PM about this he said they framers put it there initially, but it can be moved and he just hasn't been out to the house yet to look at everything. Ok, sounded like we were still on track to have it moved from the hallway. I brought this up again during the pre-drywall meeting and we received a different answer. First off the amount of floorboard space is much much less than we had anticipated. It's basically a large strip down the center of the house. Our PM stated that they can't go out to the edges of the house because it isn't supportive enough. To give you a frame of reference, we had initially talked about possibly putting attic access in the guest room, well the entire square footage of the guest room doesn't have any floorboards over it for attic storage. So that is obviously a wash. It's also not possible to place in the laundry room due to HVAC components and plumbing. That was a little disappointing, though I understand if there is something they just cannot do for safety or code reasons, however, I don't like to feel as though I'm being yes'd to death if something can't happen. We have noted a few instances were we are being told 'oh yes we can work on that' when it seems as though what we asked for isn't even a possibility.

Anyway, off of my rant, we did a quick review of the paperwork to make sure nothing was missing and we were all on the same page moving forward. The only thing we caught was that they failed to rough in the two pendant lights we requested  above the kitchen island. My husband caught this during the walk through (not bad via FaceTime!) and it was on our paperwork, just overlooked. The PM said this would be taken care of.

Just as we were finishing up our private inspector arrived. The PM couldn't stay because he had other meeting, but they were able to meet and exchange info. We decided to use Quality Home Inspections based out of Newport News VA for this and our subsequent inspections. Floyd, the owner of the company, performs the pre-drywall inspections himself and we were very satisfied with him. He is also a Class A contractor which I liked because I felt like he could really look at things from a builder's perspective as well as an inspectors. He went through the house with a fine tooth comb, snapping pics and putting blue tape in quite a few places. He explained some things to me (my phone died so my husband couldn't be present for this one) along the way, and I was able to see what he was talking about in most instances though sometimes the builders jargon got in my way. The plan is for him to email the report and pictures to me as well as the PM.

I spoke with the PM briefly following the inspection and he told us that the items in the inspection would be addressed and pictures sent of the changes. I'll post the report when we get it so you can see some of the things that they found and what they look for in a pre-drywall inspection.

Thursday, May 21, 2015

Doors and Windows and Wires Oh My!

My husband has to be out of town for about a week and a half so we made sure to take one more drive by the build site right before he left. The house now has windows, doors, stairs and all the exterior wrapping. Here are some pics! They are from Tuesday, May 19th which was Day 21 of building.

Top window is a bedroom window, bottom window is to the dining room and back window is morning room

Two bottom windows are living room, to top middle are loft and each side window is a bedroom

The doors all start off white then are painted the chosen color

Today, on Day 23 of building I met with a rep from Protection by Design to review all of our wiring choices. We met at the house, and did a walk through to make sure they knew exactly where we wanted our wiring placed. It was fun to walk through the inside of the house now that it's all framed. Today they were installing the HVAC system and it was a buzz of activity. Here is what we currently have as our wiring choices. It's changed very minimally from our initial diagram (http://buildfromafar.blogspot.com/2015/03/wiring.html), but we did move a few things around. Also we have a few days to mull it all over and make sure we are happy with it before they begin installation. 
First Floor Wiring

Second Floor Wiring
The SR from Protection by Design told us that they also throw in a network cable as well as a video cable in the attic. This way if we were to decide we wanted something additional in the future we have those wires installed. He said it is also a good backup to have in case a wire gets cut somewhere along the way. That sounded good to us, we are all for adding things that will help out in the future. Ryan homes installs smoke detectors to code, and Protection by Design will install a smoke detector as well (usually right along side Ryan's) that will be connected to the monitoring system (if you sign up for monitoring), meaning it will contact the emergency services. So we will take the next day or two to make sure we are 100% confident in our placement choices and then contact the rep if we need to move a location of a wire. 

We really tried to think about our future in the home, as well as potential future owners and what would be desirable. That's why we have a cable outlet in each bedroom. We thought about where we planned to put the beds and chose a spot on the opposite wall for the outlets. This is the same reason we wanted two cable outlets in the Master Bedroom. One where we feel it will be opposite the bed, and one in the sitting area where you can put some chairs or a love seat (we saw this in a few models). Same can be said for why we have two cable outlets in the family room, one on each opposite wall. We plan to put our television against the back wall (and the surround sound will be oriented that way) however we felt it smart to add a cable outlet to the opposite wall as well in the event we change our minds about the TV placement or if future owners choose a different wall.  It's so easy to add at this stage of the game and much more difficult/expensive down the road, so why not make sure we have plenty of options.

Lastly, it's looking like we will be ready for the pre-drywall inspection next week. The PM will do his own inspection, however we have decided to bring in an outside inspector as well. This was recommended by our realtor and after looking into it we feel it's a smart decision. It's a very good way to catch things that won't be seen once the drywall is in place, but could cause problems in the house down the road. We have decided to use Quality Home Inspections (http://www.qualityhomeinspections-va.com), and have the inspection scheduled for next Friday, May 29th which will be Day 31 of building. 

Saturday, May 16, 2015

What a Difference a Day Makes

We can't seem to stay away from the build site, especially now that each can show dramatic progress. It's so exciting!! We were there Thursday and the first floor was framed and had floor boards on it for the second floor, but the second floor wasn't framed at all. We stopped by again today and...


There's a house on our lot!!!!! I was was totally surprised by how much they got done in the past two days, and they were hard at work today as well! Can't wait to see what the next few days will bring.

Friday, May 15, 2015

Breaking Ground and More!!

I'm a little behind with my updates as we broke ground on our home on April 29th!!! At the same time our house in CA was being packed, cleaned and loaded up on the truck. We have also driven cross country, and are now officially in VA!! So needless to say it's been an absolutely insane few weeks. I'll try to catch you up with all the home building details.

As I said, we broke ground on April 29th. Things have been moving along nicely since then, there were a few days of bad weather but it doesn't seem to have held anything up. Here are a few pics from Day 1 of building! They are pics of the home's footing, reinforced with steel before the concrete was poured which also happened on Day 1.


Our realtor headed to the build site on May 5th, which was Day 7 of building and took some pictures of the start of the foundation. 


We arrived in town on May 10th!! After checking into our hotel we went straight to the build site since the model home also happened to be having it's grand opening that weekend. We were so excited to walk through the model because it's a Rome and we hadn't actually walked through our floor plan yet. When we were originally looking we saw a Milan model but there wasn't a Rome nearby to view. I'll cover that in more details in my next post. This next group of pics is from May 12th which is Day 14 of building. 


The next day, May 13th we scheduled time to meet with our PM in person at the build site so he could answer some questions, actually meet us, and show us the progress thus far. We were so surprised to see the difference in work that one day could make. Take a look at the pics!


Framing has begun!! It's really starting to look like a house now and we are getting very excited! I'll go over a few things the PM explained to us. First off Ryan Homes does 'stick framing' as opposed to using prefabricated, engineered wall panels. I wasn't really sure if this made a difference as far as build quality so I did a little research. It looks like prefabricated wall panels can be cheaper, faster and require less man power at the work site. Stick framing allows for flexibility on the site if there are any issues, but does seem to be the more expensive route, as well as requiring more manpower. I didn't really read anything about a difference in quality which made me feel good. 

The dirt pile you an see in the pic behind the kiddo and in the second pic will be flattened out to become the floor of the garage. Our PM told us they are expecting to have the roof up by May 19th which is the end of the third week of building. It's amazing how fast the house is going up! Another thing our PM explained to us is that for a 2 story house the AC and heat is single zoned, it becomes dual zoned if you opt for a 3rd floor. We were are bit surprised by this because we were under the impression that the house was dual zoned. We are looking into this. 

The whole neighborhood is a bustle of activity. We were blown away by the amount of work that has been completed in the two months since we were there picking out our lot. We are planning to bring in an inspector to conduct a pre drywall inspection and our PM told that should happen in around 3 more weeks.